Hi friends ,
Today we are going to add dimension in Ax 2012
You can add dimensions to Microsoft Dynamics AX. The product ships with three dimensions: Department, Cost center, and Purpose.
Dimensions are based on extended data types that are defined as arrays. The extended data types with dimension information are as follows:
Dimension
DimensionAllocation
DimensionCriteria
DimensionKeepFromTransaction
DimensionLedgerJournal
MandatoryDimension
ADD A DIMENNSION::
1.In the Application Object Tree (AOT), add a new array element for the dimension to each extended data type listed above.
2.Associate the new array element with certain dimension table fields by doing the following for the Dimension and DimensionCriteria extended data types.
a.Click the extended data type, and then click the new array element.
b.Right-click Relations, and then click New > Normal to add a normal relation.
c.Right-click the relation, and then click Properties.
d.Set the Table property to Dimensions, and then set the RelatedField property to Num.
e.Right-click Relations, and then click New > Related field fixed to add a related field fixed relation.
f.Right-click the relation, and then click Properties.
g.Set the RelatedField property to DimensionCode.
3.Add a new value to the SysDimension enumeration that represents the new array element by doing the following.
a.Click Data Dictionary > Base Enums, right-click the SysDimension, and then click New Element.
b.Right-click the new element, click Properties, and then modify the Name property.
c.Modify other properties, as needed.
4.Create a relationship between the LedgerJournalTrans table and the Dimension table by doing the following.
a.Click Data Dictionary > Tables > LedgerJournalTrans, right-click Relations, and then click New Relation.
b.Right-click the new relation, and then click Properties.
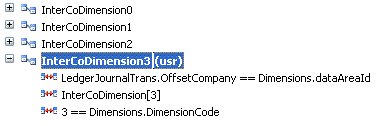
c.Set the Table property to Dimensions, and set the Name property to InterCoDimension
d.Add a related field fixed relation and two normal relations to the InterCoDimension relation, as shown in the following example.
5.Modify the LedgerAllocation form to display the new dimension by doing the following.
a.Right-click the LedgerAllocation form, and then click Compile.
b.Locate the following group controls in the TabPage:Dimension control, set the AutoDataGroup property for each group control to No, and then save the changes.
Group:FromDimensionNo
Group:SelectionCriterion
Group:To
Group:KeepTransactionDimension
The system automatically adds a new control to each group control that corresponds to the array element that you added to the extended data types in step 1.
Vivek Chirumamilla
It is very very helpful for all of us and I never get bored while reading your article because they are becomes more and more interesting from the starting lines until the end.
ReplyDeletedimension control service
Really awesome blog. Your blog is really useful for me. Thanks for sharing this informative blog. Keep update your blog.
ReplyDeleteDimension Control Services in Bayern Germany